Create, send or schedule an 'invoice' campaign and
store customer contact information using one simple API, enabling access to:
- Dynamic messaging templates
- Automated unique Invoice URL creation
- SMS or Email queue, scheduling and throttling options
A batch campaign can accept up to 5,000 recipients (email address or mobile numbers)
Dynamic templates
Glider batch request gives you extensive flexibility on how to engage with your users by using customisable templates.
You can set:
- custom message templates: text message for SMS campaigns and subject and email subject and body for EMAIL campaigns
- custom payment portal templates: introduction text on the payment portal end-user landing page
In order to achieve a high level of personalisation Glider introduces two types of variables that will be unique for the end-user:
- dynamic variables
- custom variables
The main difference between the two are that custom variables are structured on a pair label / value system, they can be used within report filtering to then enable a preset portal template style.
Messaging templates
In order to use a template variable you need to add its value on the recipient JSON object (or CSV) and specify where you want to display in the template by typing the variable name wrapped in double curly brackets.
For example, let's assume we have to send two invoices, one to Joe and one to Mark.
Joe owes $200 for "May Electricity Bill" and Mark owes $150 for "June Internet Bill".
We want to integrate this personal information into the SMS message, therefore we will:
Set up the template as:
Hello {{name}}, this a reminder for your {{item}}. Please click on the {{url}} to pay ${{amount}}. Thanks
and the recipient object will be like:
[
  {
    "name": "Joe",
    "account_number": "123456",
    "amount": 200,
    "item": "May Electricity Bill"
  },
  {
    "name": "Mark",
    "account_number": "875432",
    "amount": 150,
    "item": "June Internet Bill"
  }
]
Joe will receive the following text:
Hello Joe, this a reminder for your May Electricity Bill. Please click on the https://pay.gliderpay.com/fju4jd to pay $200. Thanks
instead Mark will the receive this one:
Hello Mark, this a reminder for your June Internet Bill. Please click on the https://pay.gliderpay.com/fju4jd to pay $150. Thanks
Both dynamic variable and custom variables can be used on:
- SMS content
- Email Subject text
- Email body text
N.B.:
A variable cannot be called url , amount , account_number , attachment or cannot have suffix _value or _label because these names have been taken as Glider keywords.
Payment portal template
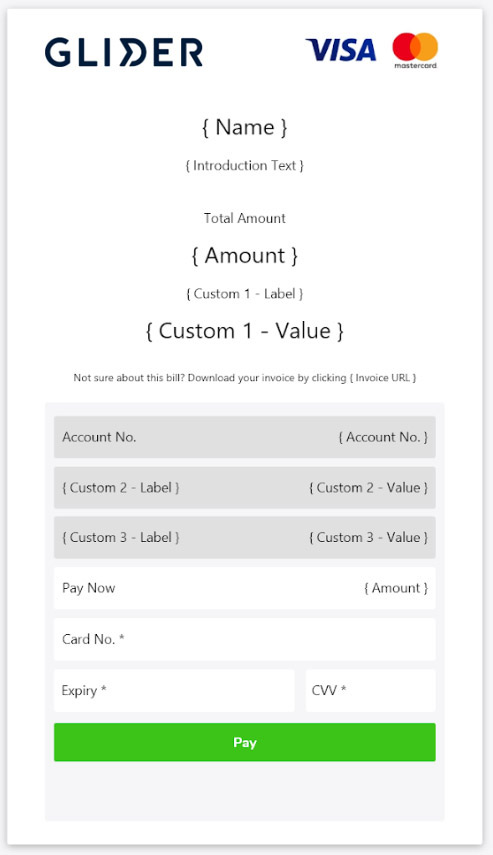
To customize the payment form, we can use custom fields.
By default the template will be rendered in the following format:

Introduction text and attachment text are defined during the on-boarding process and they are the default for all glider campaigns.
Glider allows 2 "static" values: name and attachment and 3 dynamic custom fields
Custom fields work in pair, to define one, we need to define a pair of {label, value}. Custom fields are identified by custom#_label and custom#_value name.
The label is the name of the field (e.g. "SKU") and the value is the actual value of the field (e.g. "HK0004578").
Here's an example :
{
  "name": "Joe",
  "account_number": "123456",
  "amount": 200,
  "attachment": "https://pdfs.gliderpay.com/123456.pdf"
  "custom1_label": "Creditor",
  "custom1_value": "BankOne",
  "custom2_label": "SKU",
  "custom2_value": "HK0004578",
  "custom3_label": "Due Date",
  "custom3_value": "10/10/2020",
}
Custom variables are optional and they don't need to be used in any order (e.g.: you can only use custom2 for example). These variables will also be available in the invoice receipt.
In case the above solution does not satisfy your needs you can fully customise the payment portal template for each single campaign to your desired experience.
Dynamic payment portal template
By setting up the paymentPortal attribute in the API request the HTML value will be rendered in the Payment Portal user landing page above the form, replacing the standard one.
The available HTML tags that can be inserted within this template are:
<h2> <h3> <br> <i> <b> <small>
paymentPortal template lets you render dynamic and custom variables.
Example of a paymentPortal value:
<h2>{{name}}</h2>
<br>
Your outstanding debt is being managed by Glider.
<br>
The matter relates to an invoice that originated with:
<h3><b>{{company_name}}</b></h3>
ACCOUNT <br>{{reference}}
<br><br>
We are offering a <b>{{discount}}</b> discount if the invoice is paid <b>in full</b> by {{custom3_value}}
<br><br><br>
To receive the discount, please pay:
<h2>{{amount}}</h2>
In order to make a successful request with the above portalTemplate your recipient object should look like this:
{
  "email": "[email protected]",
  "name": "John Doe",
  "account_number": "22222",
  "amount": 5000,
  "company_name": "Green Energy"
  "reference": "5353-XXXX",
  "discount": "75%",
  "custom1_label": "Due Date",
  "custom1_value": "10/10/2020",
}
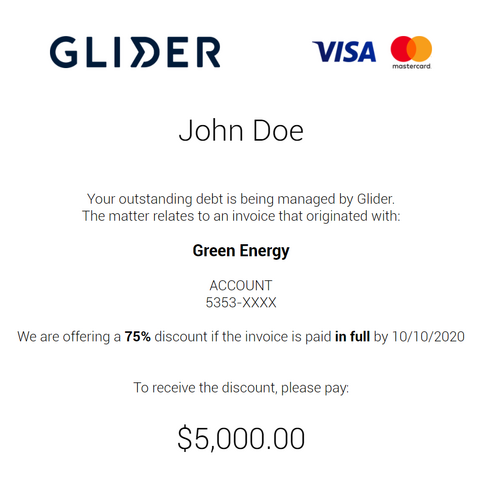
With the above example the payment portal will render like this:

N.B.: paymentPortal will overwrite the rendering of custom variable 1 and attachment, however you could specify and use those value in your template (as per example above).
Before sending out the campaign you can test your template here:
https://jsfiddle.net/ebottos/ht0L8mxe/
API Specs
A Glider Batch campaign can accept up to 5,000 recipients.
You can choose between the following channels to notify your users:
- sms
- link
link channel will only return the list of unique urls and will not send a notification.
Each channel requires different parameters and validation, therefore we have an endpoint for each of them.
The basic path is:
<METHOD> https://api.ubiquityplatform.com/glider/batch/v1/invoiceBatch.json/{channel}
Headers:
  ...
Body:
  ...
The Batch request will accept the recipients as a JSON object or as a CSV.
The JSON object option will be extensively explained in the documentation below,
if you want to upload a CSV instead you need to use the header
Content-type: multipart/form-data, boundary={boundary value}
and upload the csv in the buffer request
CSV file formats accepted are:
text/plainapplication/vnd.ms-exceltext/x-csvapplication/csvapplication/x-csvtext/csvtext/comma-separated-valuestext/x-comma-separated-values
